-

-

Saturday, November 20, 2010

A Grub and a Tip

Two items to follow up my Stumped post:
First, check out this huge grub that was living under the stump.  It was almost 3 inches long.  Kinda cool, kinda creepy.
And the tip.  A while ago, I took a chain from my saw in to get sharpened.  The guy at the counter looked at the teeth and pronounced it worn down too far to put an edge on it.  He suggested keeping it as a utility chain for working in the dirt.  Nothing dulls a chain faster than hitting dirt, but with a dull chain like that, you can work in the dirt without fear.

I once had a huge Pampas Grass plant to take out.  The roots were a solid mass. I carved them up with the chainsaw into roughly foot square pieces, and pried them out.  Using a dull chain was so much better than trying to do it with a shovel or an axe.

Tuesday, November 16, 2010

Stumped

"No worries," I said, "I'll just take it out." It is always so easy to say that.

In sprucing up our barn, we moved the big door to right behind a stump.  Now it was time to take that stump out. 

It was a cherry tree, dead a few years.  My first thought was to cut it off at ground level, and deal with the remnant later.  A couple of cuts told me that was not going to work.  It was hard as can be, and my saw was not so sharp.

So I did it the old fashioned way.
I dug my way around the stump, exposing each root then tunneling under it.  Once I had clear airspace beneath it, I cut the root out with my chainsaw.  There were 8 or 9 big roots, and it took a while to make it all the way around.
Finally it started to wiggle.  A little more digging revealed two more roots, going almost straight down.  It was not long before it was laying on its side.
I filled the hole in with dirt and rocks, and mounded it a bit, hoping it will compact to level over winter.  I was much happier with this result than if I had just cut it off.  I know we would have been fighting that remnant, and eventually hired someone to come and grind it out.  This way, all it cost was two hours of my time, and a new edge for my chain.

(The only mishap was the groggy yellowjacket who somehow got into my pants.  A sting or two on the back of the knee was all the damage. Not bad, considering.)

Monday, November 15, 2010

Sounds Day and Night


We have been working hard here at the homestead, clearing brush and patching roofs, but we still try to take the time to stand still and listen once in a while. The perception of "being in the middle of nowhere" is that it is quiet. It is not. There are always creatures filling the air with chatter. As the day goes on, the sounds change. The birds sing different songs in the evening than they do in the morning and different kinds of wildlife take the night shift.


 The "children's moon" from the other night.


Thursday, November 11, 2010

Fall Clean Up

About half our land is forested and half clear.  At least, it was clear.  Now, most of the pastures are deep in Scotch Broom and blackberry.  With plenty of old, downed trees mixed in.
We are slowly chipping away at it, but with house, barn and garden projects, and outside work, there is not a lot of progress evident.
So when we do make some headway, it feels really good.  The area above, next to the barn we spruced up this summer, has an old cherry tree that has broken apart.  Fallen limbs had crushed the fence, and the blackberries had grown up and over.
It did not take that much time to clean it up, about 4 hours of whacking the berries and pulling out the old fence posts.  The piles sat until burn season, with the grass growing up and through them, threatening to engulf them and make yet another mess to clean up.
Fortunately, I finally had time to burn.  It was the first brush fire of the fall, and it cleaned up a lot of stuff.  It took me a couple of hours to haul all the limbs and branches that had accumulated over the summer, plus the piles of cut vegetation.  It had been raining that week, so everything was pretty soaked.  It took a while to get a sustained fire, but I got there.  It burned all afternoon, and might have gone on a bit past the technical 'fire's out' time, but it was safe and contained.
 And the next morning, it was an open stretch of workable land.  It will be a while until we have anyone grazing on this, so until then we will need to mow it .  The amount of cleared land we have to mow is growing, and while it makes more work in the short term, mostly for Phoebe who has been our champion mower of late, it feels good to be making headway. 

Sunday, November 7, 2010

To Save or Not to Save


After I did my post on saving spinach and lettuce seed this spring a lot of people have been asking me to tell them more about seed saving. I refer them to the Seed Savers page on saving seed and I am always happy to share what I know, but really what I sense is that they just need reassurance that they can do it too.

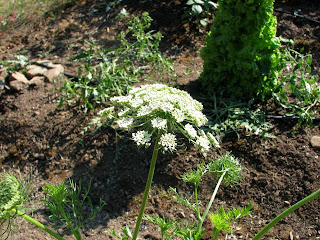
This is a carrot going to seed in my garden. I don't save carrot seed because it will cross easily with the wild carrot, Queen Ann's Lace (Daucus carota L.) which is growing everywhere on the homestead. I let it bloom because of the tiny pollinators I always see thronging to it.

There is a little science to it; some squash will cross with each other- but not all, corn is wind pollinated so you need to plant in blocks or shake your corn stalks by hand, tomatoes generally self pollinate and a few little facts like that. I remind beginners that what a blossom crosses with does not show until the next generation, from the seed produced. But it really isn't too hard and what's the worst that will happen? You get a Pumpkinni in your garden next summer. No big deal and fun to boot.


I had an upside down garden at the homestead this year and so I had the odd opportunity to collect seeds from the single miniature fruits of just about everything that I planted that needed heat to produce. A tiny melon the size of a hardball (it didn't taste too bad either), a mini winter squash, the one and only patty pan summer squash and a few tomatoes that performed well in the dreary summer (now those are worth saving).

I put my tomato seed pulp in a jar on the counter for a week or two to let it ferment the gel bags off of the seeds. Even if it molds it is fine. That's how tomatoes reproduce in nature. Be prepared for the smell when you open the jar! Tell everyone in the house what is in the jar or some helpful person may dump them out and wash the jar...

Heirloom plants are the easiest to save seeds from since they are not hybrids and will come true to seed. Choose seeds that are plump and firm. Floppy or thin seeds are not mature.

The most important things to do when saving seeds is to mark them clearly with name and date while drying so they won't get mixed up or tossed out and to make sure they are completely dry before you put them in a bag or jar or they will mold. Keep the seeds out of the bright light and keep them dry and cool. Most seeds will last for at least two or three years. I've planted ten year old tomato seeds and had them do fine.

And remember in the spring that you can plant as many seeds in a hole as you like because you can thin the sprouts (with scissors) when they come up and the seeds were free!

These are the spinach seeds I saved this spring. They are now growing in my winter garden.

Here's a little slide show of some of my seed saving efforts this fall.


Tuesday, November 2, 2010

The County Fair

In all of the hubbub of vacation, I forgot that the week before we had gone to the County Fair.

It was super fun and really sweet. I have gone nearly every year of my life and it just doesn't feel like summer unless we get to go to the County Fair. So here is a little piece of summer for you.


Monday, October 25, 2010

What Came First, the Egg or...


O.K. So I waited a while to post this strange happening because I am afraid no one will believe me, but I have decided that as a journalist, of sorts, I needed to post this strange freekish happening and the hell with my credibility!


First, let's review two points that have been established in previous posts : 1) I have had chickens most of my life. 2) our Cuckoo Marans lay a lot of double yolkers.

A couple of weeks ago I had a basket of eggs (we've gotten a little behind on our egg eating lately) and I decide to make a frittata.

I look into the basket and I see a HUGE egg. It's a little misshapen and I think to myself "Ouch! That had to hurt." Then I think "It's so big it might be a triple yolker!"

This is where, in retrospect, I wish I had taken a picture
before I cracked it open.

Because what is inside of this gigantic egg is NOT two yolks, is NOT three yolks but....


(cue Twilight Zone theme song) an EGG INSIDE OF THE EGG! (and a little egg white), with an actual hard shell! I have
never seen such a thing before, nor has any farmer I have asked.


I loved our daughter June's reaction "How does that even happen?" she says with a disgusted look on her face. We pondered, but knowing chicken eggs are formed in a sort of ovarian assembly line procedure, could think of no reasonable explanation.
So which came first, the egg or the egg inside the egg?