-

-
Showing posts with label chainsaw. Show all posts

Saturday, January 3, 2015

Reluctant Homesteaders Top Ten Tools For Homesteading


Sometimes, as I walk up and down the hill, up and down the hill, I think about the things I use to get things done here at the Homestead.
I have started playing a game in my mind. Like one of those "Stranded on a desert island" games. If I had to pick 10 items to start with on a Homestead, what would I want to have with me?
One of the benefits of blogging is that I get to really pin down my thoughts on a subject, so what better subject to do this with than:

My Top Ten List of Favorite Tools For Homesteading:
(This is a list in which I unabashedly endorse name brands, because I believe in them. I appreciate honest recommendations when I can get them, so I will do the same for you.)

green acres phone pole

Broadband Internet with WiFi amplifier: I know it's preaching to the choir, but I think the Internet is the single most valuable tool for a Homesteader. Aside from entertainment and providing camaraderie, which helps with the isolation, the Internet makes so much valuable information available to us. Although it may not seem to fit the "down to earth" idealism of getting back to the land, the Internet is the number one way to gain the knowledge we have lost on the way through our industrialized society. When our fore-mothers and fathers moved from the farms to the cities, the knowledge we need now on our Homesteads was lost to most of us. Luckily it was not lost to all of us, and even more importantly we can now share what we do know with each other! I have filled many holes in my farming knowledge with the help of others through the Internet.
The WiFi base is important. I daisy chained two of these so we could get a signal wherever we needed it. That was a boon for us because, until we had a strong enough signal to reach our comfortable living spaces, we had to sit in a field to get a signal.

 
16" Stihl Chainsaw: Stihl chainsaws have always been the best of our assortment. I have seen many brands come and go from the Homestead and Stihl is the one that keeps on working. My favorite is the sixteen incher. It's good for trimming limbs, cutting brush and can do more than it's fair share around the farm. And it's not so big that it wears you out to lug it around. I LOVE the quick chain adjuster.
Maintenance Tip: Take the time to find a supplier of non-ethenol gas to use in your saw. The side effects of ethenol will make your "quick job" a "half-the-day job" as you struggle to get your saw started and run smoothly. Why mess with it?

Snapper Side-Discharge Lawnmower: Many of you regulars can attest to my rhapsodic tendencies when it comes to my mower. Snapper is the only one for me.

4x8 Trailer that can be pulled by a car: Man, do we love our trailer. And when gas prices are high, we love that we are driving cars and not pick-up trucks.

Felco Loppers and Pruners: I cannot stress enough the importance of a quality tool when it comes to pruners! These babies are the best thing since sliced bread. They are expensive as an initial investment but they are fully serviceable with replaceable springs, handles and blades. You will never regret the purchase of these Felco tools and the minute you buy one you will stop using all of your other pruners.
If you have a helper on the Homestead, buy one for them also or you will soon be in a slap-fight over who gets to use the Felco. Every day.
Purchasing tip: register yourself at a wholesale nursery supply where you can get these at a substantial discount. Don't be afraid to ask at the desk. Most are more than glad to make a sale and don't even care if you are a real business or not. They prefer the don't ask, don't tell method.

Cordless Drill/Driver: Cordless is the way to go. Our little Makita can do just about everything we need, and when it can't (like bore a 1" hole through a green 6"x6") Our DeWalt can. The Makita doesn't have a place to stow bits like our DeWalt does. As small of a detail as that seems, it is continually a downer for me when I get somewhere on the Homestead and realize I don't have the star bit or the bit I have in the driver is the wrong gauge. Also, jeans pockets full of bits tend to end up in the washer, not the tool box.
But the Makita has a fantastic light that shines when you pull on the trigger. I love this feature and have used it, like crawling under the house, several times to get out of a dark place.

Loop Handled Wheelbarrow: Although this may seem to be a small feature, believe me, it is worth looking for! We have 5 wheelbarrows and this is the one that wins hands down, because of the looped handles. They afford a tremendous amount of control and never slip out of your hands while pulling it up hills or bumping over rough terrain.
Possible Hack: For those who are taller than 6 foot, I think the handles would work just as well flipped up.


Eccotemp LP Instant Hot Water Heater: Hot water is what keeps a muddy, dusty, cold and doggie life civilized. Not to mention the psychological and sanitary benefits. These units are very affordable and even if you are lucky enough to have a house with running hot water, you could use one of these. Dog baths have never been so easy! I also use it to wash stinky boots properly and hand wash halters and other horse paraphernalia. If you show dogs or horses this would be perfect in the barn.
One Caution: Do not let this unit sit un-drained when it is freezing outside, even just a frost. (And I mean PROPERLY drained, with the little plug on the underside removed and the water supply not only shut off, but open so air can get in. The copper tubing in them is very thin and delicate.)


Good Boots: Good boots make my life so much easier. Here are my favorites. Muck brand rubber boots: They are warm and comfortable with a good arch support. The middle boots are Sorel men's boots I bought on sale. They are my construction boots. I wish they were water proof, but they fit well, and they are comfortable for a 12 hour day.  The furry ones are my newest and favorite. They are Columbia Sportswear and are the warmest waterproof boots I have ever owned. For farm boots they are super cute. Hmmm. In the past I had heels and sandals, now I just wear boots with everything. Well, honestly, I haven't worn a dress in over a year so...


Farm Dogs: They're good company and good security. Nothing is more valuable for security on a Homestead as having barking and menacing dogs. Especially when you have no neighbors to keep an eye on the place. They also keep the wild monkeys and rubber chickens under control.


Next post: The Top Ten List of My Favorite Homestead Gadgets!


Tuesday, March 19, 2013

Pruning

When we moved onto our "town" property 14 years ago, the three big, old apple trees had not been pruned in quite a while. Since we had no experience with that we sought out some expert advice.

In our area, the Home Orchard Society is a great resource. We went and got a little tutorial to help us get started. I thought I would share some of what I learned then and have picked up over the years. I am no authority, so I will offer it up in the spirit of conversation rather than education.
I took away three big lessons:

-The right time to prune is when your pruners are sharp. This means that it is better to prune when you can then wait for the perfect time of year. Apple trees are very forgiving. I just finished pruning my trees today, and it is certainly not the best time of year. Each branch that falls through the tree after I cut it hits others, potentially damaging the fruit buds that are showing now. But now is when I can do it, and it is more important to lighten the load and avoid limbs breaking than worry about getting every apple possible.
-Give yourself 3 years to reign in an overgrown tree. The overgrown tree has a root system big enough to feed the whole mess of a tree. When you prune you do not diminish the energy the roots are going to push into the tree, so there will be more energy than the now-smaller tree needs. That energy will turn into massive new growth. Figure out how much you want to take off the tree, and do 1/3 of it each year for 3 years.
-Take out limbs, not branches. With one cut you can take off a limb with several branches and tons of twigs. Try to cut out the biggest wood you can. It will save you time and effort. And since new growth will come where you have pruned, one cut at the trunk will inspire less new wood than a bunch of cuts along the length of a branch.
When shaping your tree you want a nice, open structure, with good airflow, no branches rubbing, and no branch shading another. I also try to be aware of potential weight on the branches, because when they are laden with apples it adds a lot of weight, which can cause the branch to break.

Keeping them high enough above the ground is a big deal too. You want to make it easy to get under the tree for mowing, walking and picking. I sometimes get a little stingy, trying to keep more apples than I should. Phoebe did a nice job of pruning them up last year, when I was letting them hang too low. 

The basic tools I use are hand pruners, loppers and a pruning saw. A chainsaw on a stick can be very handy, depending on the height of your tree. 

And you need a way to get into the tree. Phoebe bought me a 17' orchard ladder, which is a fabulous tool for these big trees. Orchard ladders have 3 legs, which gives you a stable platform on uneven ground. I wish I had a shorter one too, like a 12', for getting in around the base of the tree.
You can use an extension ladder for a lot of pruning, but it has to rest pretty close to the trunk to be well supported. An orchard ladder can be used during harvest too, getting you out at the end of the branches, where an extension ladder will not have the support.

I took the three years needed to get the trees into good shape. Since then it has been about maintaining them. A big task every year is taking off the water sprouts. These are the little whippy branches that poke out every year, like in the photo below. 99% of them have to go, or they will turn into the branches that overgrow the tree again.
The 1%? I am always strategizing about where I want to encourage new growth. If there is a hole, I will leave a few sprouts to see if one can fill it. In the photo below, I hope the one I saved will grow into a big limb to fill an open spot.
I had a major limb break out of one of the trees. It probably took out 15% of in one go. I was very sad. I have about 6 sprouts I am letting grow. I can decide in a few years which is the winner, and take the rest off then.
Here is a look at a spot where I made a bunch of cuts. Mostly I removed branches that were under others, and therefore shaded by them. My goal here was primarily weight reduction, but the improved airflow should make the apples happier.

Most years I do lose some medium sized limbs; Self-pruning I call it. This one is still attached by enough bark that the rest of the limb is still alive. Since it was in a helpful spot I decided to leave it.
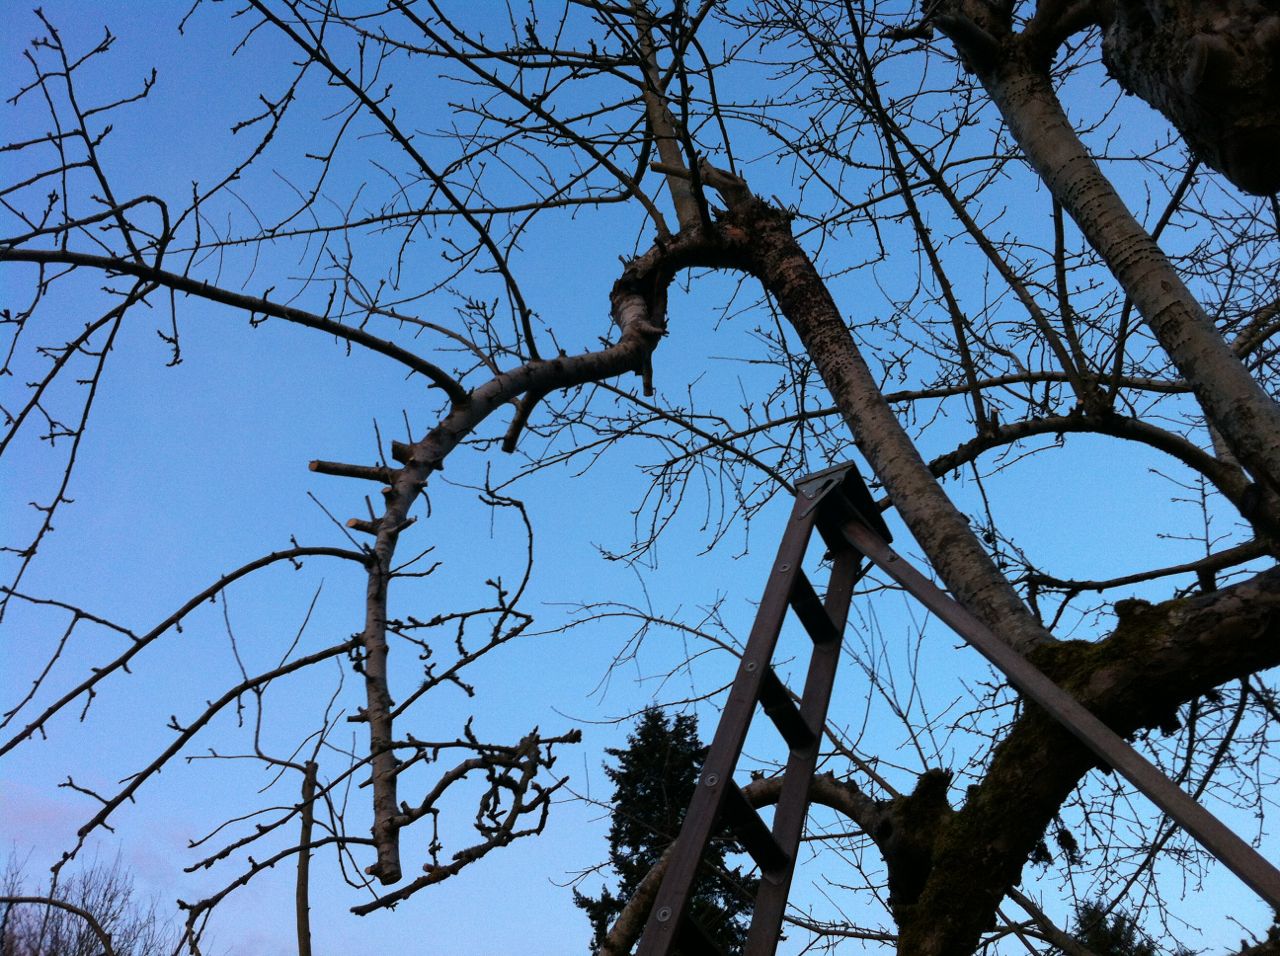
I took a bunch of the branches off it so it will be less likely to finish breaking. I hope I can get a couple more years out of it, buying time for its replacement to get big. In the photo below, you can see the break above and left of the top of the ladder.
My biggest tree will generate hundreds of branches cut out a year. Fortunately this day the boys had made a fire to burn up the brush pile. Hank was nice enough to hang out and pick up the branches as I cut them, which was sooo helpful. (The lumber is for a new chicken pen.)
It may not look like much, but I am pretty happy with the tree in the photo below. There is a lot more space and a lot less weight. I think it will do well this year.
The trees will be in bloom in a few weeks. Check back and I will show you how they look.

Wednesday, March 6, 2013

Spring Wood Work

We had a very mild winter here in the NW, which is easing into what feels like an early spring. I took advantage of some free time to tend to a few projects. I got my raspberries and grapes pruned and trained up for another year. 

My Marion Berries need a new trellis, so I go the pieces together to do that.

I pruned our Italian prunes, or at least cut back the suckers that grow like crazy from their bases each year. The trees are old and special, and I don't know what their life expectancy is, so I am encouraging a new trunk to come up from the roots, in case the old part of the tree looses its way. Not sure if a new trunk from the same roots will fare any better, but I figured I would give it a try.

And I did the lower half of two of the big apple trees. I will need to get the 17' orchard ladder out to get high enough to do the rest.
I have a row of espalier fruit trees, growing on about 40' of orchard wire. They are a 6 way apple graft, a Gravenstein apple, a Braeburn apple and a Bartlet pear. I really love them. It's fun to be so hands on with the trees, shaping and guiding them over the years. And they do need shaping; they are quite vigorous, and put on a lot of growth each year. This is the 6 way graft, looking down the line of trees.

I remove most of the new growth each year, letting the older branches get more sturdy. It is a little challenging for me a year later to remember exactly what my plan was, but the trees are getting old enough that I can kind of read them to see the shape I have been after.

After I clean them up, they have really nice silhouettes: Open and airy, so there is a lot of light getting inside them. No branches rubbing. Pretty slim, so no branch covers another and it is easy to mow right up to the base.
Last year we had really good crops on the apples, the best yet. I am hoping the same for this year.

My pear is another story. I bought the trees from a nursery when they were three years old, pretty well established for commercially grafted espaliers. The first and second year I had nice pear crops, not heavy, but good. The next few years, almost nothing. I got a tip from the Home Orchard Society that raising the ends of the branches so they don't droop might help. So when I pruned the tree this year I raised the limbs I could, attaching them to the wire above.
I am not convinced that will help, but it was worth a shot. It is possible that the polllinator, somewhere in the area, got cut down. If the branch raising does not do the trick, I may have to learn more about what it takes to pollinate these guys. My father-in-law suggested grafting a branch from  a pllinator onto the tree, which would be an elegant solution.

Soon, they trees will be in bloom. With the pears, it is a beautiful sight.

All of that pruning means the burn pile, which I took care of late in the fall, is already getting big.
 
Up at the homestead, it was wood work of a different sort. We lost two good size Doug Firs this winter, plus one half of a forked tree split off. Burn season started March 1, so Jake, Hank and I went up Sunday to get things going. One of the trees fell a ways off the road in a thicket that will be very difficult to get through. The other was kind enough to fall as close to the burn pile as it could without landing on top. Very convenient, especially because we can back the trailer right up to it. So while I cut up as much of the tree as my 18" saw could handle, the boys built a beautiful fire. (I call them boys, but they are both 31. Old habits...)
All the limbs went right on the fire, which was already a good size with all the fall trimming.
It was 50 degrees and sunny with no wind; about a good a day as you can have for hot, hard work. We got about 30' of the 100' tree cut and stacked. I will need to rent a big saw for the rest of it. I love my little saw, and would eventually like to buy one with a 28" bar, but have not been able to justify the cost. So now and then I rent one. If nature keeps providing big trees like this I may have to spring for one soon.
We got most of the split fork limbed up, and the branches burned. The boys were good sports about carrying these branches the 100 yards to the fire, but it made a big difference. We had such a hot fire going that it took no time to burn them up. If we waited and started another fire next month, it would take more effort to get the fire good and hot than it did to move the branches.

Finishing this tree is going to be a tricky one. As I said, it was a fork that split off. Well, just under the tree was an old shed. The trunk managed to fall right on the shed. 
As readers of the blog know, Phoebe can do amazing things with old sheds, so who knows what this might have turned in to. It may not be ruined, but until we get the tree of it we won't really know.

And getting the tree off it is kind of a big deal. It is actually sitting on the roof of the shed, angling down to the ground over a span of about 50'. I need to get it down to the ground, and I am not sure exactly how to do that. Other than to do it slowly. carefully, and with lots of eyes and brains around to help me figure out how it will work.
But that is a job for another day.


Sunday, June 24, 2012

Lumberjackin'

We had a tree that was felled a few years ago. We thought we might like it as a landscape feature, but decided it was not going to work out.
First we cleared away the berries and brambles. I had rented a saw with a 28 inch bar to get through the thick end.  
I also had help. My son joined me with our newest farm-mate, Hank, a college friend of his who has come up to the NW to try a new direction. It was the first time for both of them being lumberjacks.
The tree had to come down because it was rotted inside. The first 10' or so was hollow. The edges were good, but the center was gone.
Pretty soon we got into full, solid rounds.
The boys spelled me with the saw. It takes a long time to get through wood this diameter and I wore out after a couple of hours.
 
It was their first time using a saw, but it seemed like a good time to learn. A saw like that handles like a Cadillac at 70 on a straight road. More training will be necessary before they are ready to use a smaller saw in the woods, but they did great.
A problem came as we got a little ways up the trunk. The further we went, the deeper the log was sunk in the dirt. We figured there was a lot of whiplash as it fell, causing the top to slam harder in the ground, sinking it deeper.

The worst thing for a saw chain is hitting dirt. I am not sure why it can chew through solid wood easily but goes dull at the slightest contact with soil. (If you know, fill me in.)

With a 28 inch bar and the wood 6" deep in the dirt, I was having a hard time making a clean cut without ruining the chain. I had a backup chain, but a lot of wood to get through and a long ride to the rental shop if it went dull.

After conferring with Phoebe and the boys we decided on a strategy. We grabbed a 4X4 for leverage, and some timbers to pry against. An adz was used to clear out the dirt from one side. 
I cut several rounds 3/4 through, stopping before I got near the dirt. Then we carefully dug one out and made a full cut.
 
We wedged the beam in and pried.
It took a fair amount of levering but we were able to roll the log a quarter turn and finish the cut safely above the dirt. It was an old school approach, and really satisfying to have such simple thing work so well.

The boys used a splitting maul and wedge to beak the rounds into manageable chunks. We will finish the splitting this fall, once the weather cools a bit and it is nice and dry.
It was really gratifying to do the work, made even more so by spending time working with the boys. It has been far too long since Jake was at home, and we are enjoying getting to know Hank.